Working with SAS
With Anaconda Enterprise, you can connect to a remote SAS server process using the official sas_kernel and saspy. This allows you to merge SAS and Python/R workflows in a single interface, and to share your SAS-based work with your colleagues within the Enterprise platform.
Note
SAS is currently available in interactive development mode session only, not in deployments.
sas_kernel is distributed under the Apache 2.0 Licence, and requires SAS
version 9.4, or later. SAS is (c) SAS Institute, Inc.
Anaconda Enterprise and sas_kernel
Anaconda connects to a remote SAS server application over a secure SSH connection.
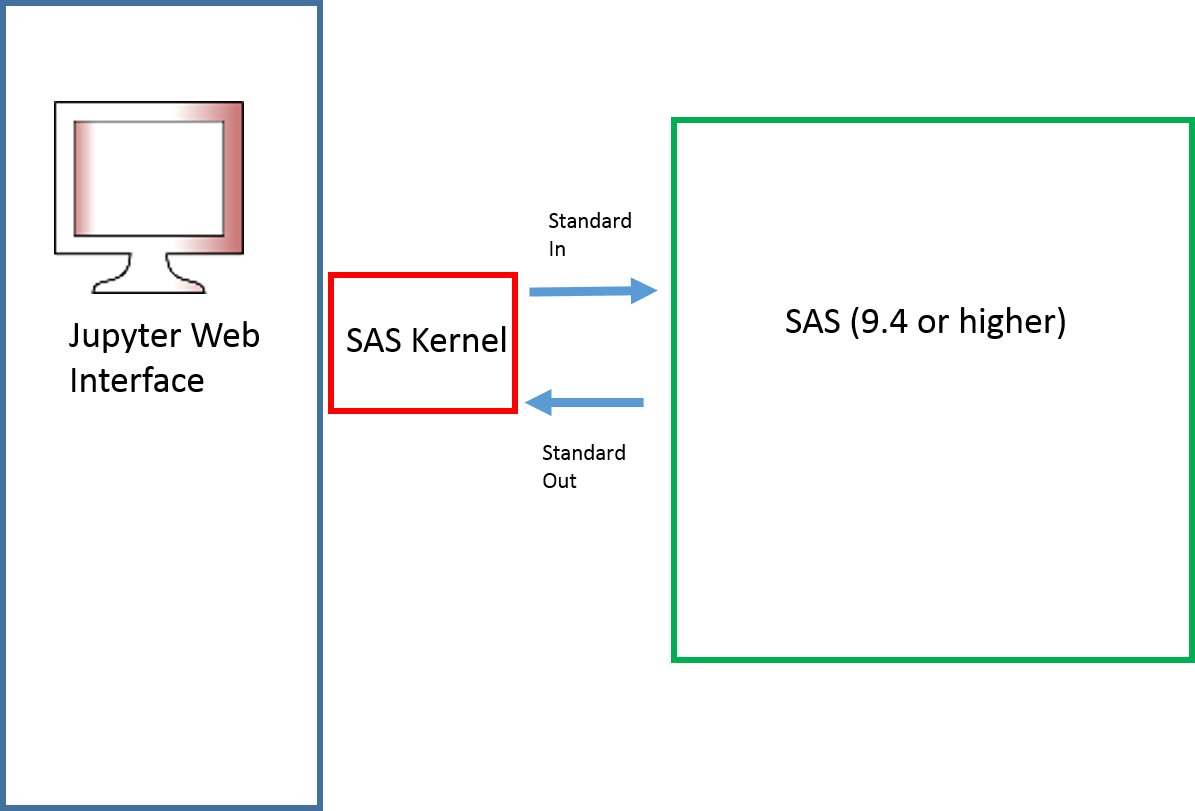
After you configure and establish the connection with the provided SAS kernel, SAS commands are sent to the remote server, and results appear in your notebook.
Note
Each open notebook starts a new SAS session on the server, which stays alive while the notebook is being used. This may affect your SAS license utilization.
Configuration
The file sascfg_personal.py in the project root directory provides the
configuration for the SAS kernel to run.
Normally your system administrator will provide the values to be entered here.
The connection information is stored in a block like this:
default = {
    'saspath' : '/opt/sas9.4/install/SASHome/SASFoundation/9.4/bin/sas_u8',
    'ssh'     : '/usr/bin/ssh',
    'host'    : '[email protected]',
    'options' : ["-fullstimer"]
}
'saspath' must match the exact full path of the SAS binary on the remote system.
'host' must be a connection string that SSH can understand. Note that it
includes both a login username and an IP or hostname. A successful connection
requires that both are correct. The IP or hostname may have an optional suffix
of a colon and a port number, so both username@55.55.55.55 and
username@55.55.55.55:2022 are possible values.
Establishing a Connection
Whenever you start a new editing session, you must perform the following steps before creating or running a notebook with a SAS kernel:
From the SAS project, edit the configuration file sascfg_personal.py with your SAS path and host as mentioned in the configuration section.
In the following example, replace the default values with your own:
{{SAS_config_names = ['default']
SAS_config_options = {'lock_down': False}
SAS_output_options = {'output': 'html5'}
default = {
'saspath' : '/opt/sas94/sashome/SASFoundation/9.4/sas',
'ssh'     : '/usr/bin/ssh',
'host'    : '<username>@<ip-addr>',
'options' : ["-fullstimer"]
}}}
Open the Terminal from the project and run the following to generate a key:
ssh-keygen
It will prompt you to enter the file, hit enter to save the key as id_rsa in /opt/continuum/.ssh.
Next, it will prompt you to enter a passphrase. Hit enter for no passphrase.
You will see two files, id_rsa and id_rsa.pub. The file ending in .pub must be known to the SAS server. You can view this file in the terminal with the cat command:
cat id_rsa.pub
Log in to your SAS server using your username and password. Edit the file ~/.ssh/authorized_keys as user and append the contents of the id_rsa.pub file there. You can edit the file with any console text editor on your system, such as nano or vi.
From the project Terminal, run the following command to test the connection to your SAS server:
ssh <connection-string> -o StrictHostKeyChecking=no echo OK
Replace connection-string with the host entry in sascfg_personal.py. You should not be prompted for the SSH key’s passphrase or password.
Now you can start the notebooks with the SAS kernel from the launcher pane, or switch the kernel of any notebook that is already open.